There's a chance that you have heard of Metamask in the past year or two. But, if you haven't, don't worry, as I'll try to explain it quickly. Metamask is an Ethereum crypto wallet, and serves as a gateway to dApps (decentralized Apps). Coinbase has the following definition for a crypto wallet:
Crypto wallets store your private keys, keeping your crypto safe and accessible. They also allow you to send, receive, and spend cryptocurrencies like Bitcoin and Ethereum.
For a more complete explanation, I recommend reading their full blog post, but for the ones that won't read it, I want to highlight that Metamask is just one option between several existing Hot Wallets (Online Wallets). However, for various reasons that don't matter here, Metamask grew into one of the most used wallets.
The main idea of my discussion today is not limited to the Metamask wallet only but can be applied to any other wallet as well. However, you'd need to adjust the code a bit for other wallets, as they may handle Javascript events differently. If you want to support multiple wallets in your dApp instead of doing all the manual work for each one individually, it's probably best to look into things like RainbowKit, wagmi, etc.
My teammate David Lange did an awesome talk for Coimbra.Blockchain where he talks about some of the hurdles and tools to use when developing a frontend for a dApp. I definitely recommend watching the presentation video. (It takes about 40 minutes.)
Why is it relevant?
By using a solution such as Sign in with Metamask (or any other wallet, as highlighted before) the user doesn't need to worry about an extra username + password combo for our App. Yes, I know that there are password managers, and it makes these worries a bit redundant, but let's be honest... End users of these apps don't want to trust us with their emails and passwords, even if they are random. Also, they already need to have a wallet to interact with other Blockchain features, so we might as well take advantage of that.
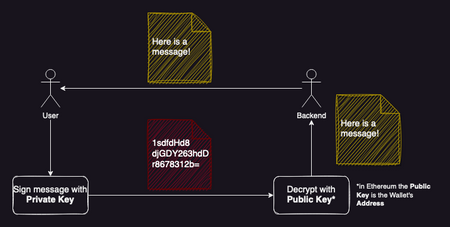
This can be used as a reliable authentication method because we know that only the person with access to that wallet's private key will be able to cryptographically sign a message, that when verified it'll correspond to the public key. Side note: in Ethereum, and some other blockchains, the public key corresponds to the Wallet's Address. We'll see below how this works with a bit more detail.
How does it work?
If you are still here, then I'm going to assume that you're familiar with how Asymmetric Encryption works (read this post if not).
The image below tries to represent how a crypto wallet can be used as a valid sign-in mechanism. The application's backend gives the User a message to sign with the wallet's private key. The backend then receives the encrypted message and uses the Wallet's Public Key (its Address, for Ethereum) to decrypt it and verify it against the original one.

Some of the more trained eyes may have seen a possible issue with the scheme above. Bear with me for a little more, because I'm going to address it in some paragraphs below.
An important note for this blog post is that the flow I'm talking about is for situations where we have a dedicated backend, and we want to maintain some kind of session between our App and the User. It's very frequent to have dApps that don't need a dedicated backend, so the User just connects its Wallet to the frontend, and can then interact directly with Smart Contracts running in the blockchain.
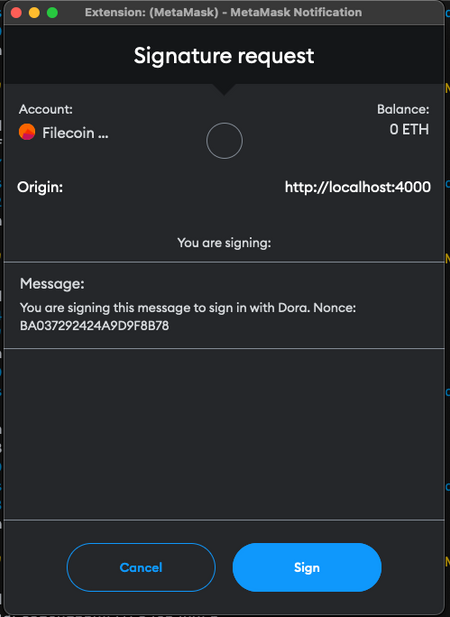
In the same way, Metamask gives you an interface to make transactions in the blockchain, it also allows the User to just sign simple text messages, using their private keys. The following image is one example. This action is completely off-chain, so therefore it doesn't have associated costs or delays.

Why Elixir and Liveview?
Well, why not? That's a valid reason, but I like to think that I have a more elaborate answer for this. To start, most projects in the Web3/Crypto space have separate frontends from the backend (at least the ones that have a dedicated backend). The reason for this is mainly because there are a lot of tools that can help with quick development if using any modern Javascript Framework.
In my case, I just wanted to do a simple API Playground where any user could interact with the project I was working on, but where it'd be possible to have an authenticated place. The API was all built with Elixir, and Phoenix 1.7 was a couple of days from being released, so I decided to take the opportunity and do something using LiveView, and have a learning experience.
A look into the desired Flow
I can't say I have used many crypto Wallets, but most of them work pretty much the same way. Before interacting with a dApp, you first need to connect the wallet to that website. I'll explain better what this is, down the line, but it's a required step regardless if you want the app to trigger any action from the wallet.
Focusing only on our goal of implementing a Sign In with Metamask flow, the base flow should look like this:
- Connect the wallet;
- Sign a message;
- Validate the signature on the backend;
- Create a Session token, if the signature is valid.
Above, we have already seen how we can sign messages using Metamask, but there is a problem with the flow I described... In that example, the user signs a message saying Here is a message!, and then the backend validates the signature, checking if it matches the original message. Even if you don't know much about cryptography, you can understand that if you always sign the same message contents, the resulting signature is the same, also. So, if your key is A and you are signing B, the final signature is always C. This way, if an attacker can intercept the Signature going from Metamask to the backend, then it'd be able to impersonate the actual wallet owner and sign in with our Application because the signature would be valid!
To solve that problem, we need to have a Nonce associated with each User in the database. With it, we make sure that every time a user is signing a message to log in to our app, that message has an extra number/string to make it different every time, therefore resulting in different signatures. Then, as our backend knows the base message, and the nonce given to the respective user trying to sign in, it's still possible to fully validate if the signature is valid or not.
All good up until now? It's time to dive into some code and see how all of this glues together.
Getting our hands dirty
The first step I took was to look for existing examples using Elixir and LiveView. I end up finding this interesting presentation, by Crystal Adkins, talking about what I wanted to learn about! The presentation links to the respective Github Repo of the project demonstrated during it. After exploring for a bit, I was able to understand how the interactions between LiveView and Metamask worked through JS, so I started working on my own version of the code.
Note: There are some differences between the project presented by Crystal Adkins and our use case. For example, you first had to sign in/up using email and password, and only then you could associate and connect Metamask with your account. In that codebase, you always sign the same message (the problem I mentioned), but I assume that it was just a Proof of Concept of the capabilities of LiveView. The same project also did more complex stuff like actually interacting with Smart Contracts, something that I'm not talking about today, and it wouldn't be present in our situation.
Second Note: The message structure being signed in my version, doesn't follow any Ethereum Improvement Proposals (EIPs) like EIP-4361. EIPs describe standards for the Ethereum platform, including core protocol specifications, client APIs, and contract standards. To implement something like that, you'd just need to change the message contents and add more information for User signing it.
To manage sessions and all the corresponding logic, I decided to use the mix phx.gen.auth Accounts User users generator, and remove all of the unwanted parts (like account confirmation, reset password flows, etc...). It's a pretty standard approach and works just fine.
Then I started the actual implementation of the Sign In button. This button is a LiveView component, and has the following mount function:
defmodule DoraWeb.MetamaskButtonLive do
  use DoraWeb, :live_view

  @impl true
  def mount(_params, _session, socket) do
    {:ok,
     assign(socket,
       connected: false,
       current_wallet_address: nil,
       signature: nil,
       verify_signature: false
     )}
  end

  # render logic and event handlers...
end
Looking at the assigns and explaining what each of them represents, is very simple:
connected: if the Metamask Wallet is already connected to our website or not. (The connect thing, I mentioned before). We can get this information fromwindow.ethereum, and I'll explain what it is, next.current_wallet_address: if the Wallet is already connected, or the User just connected, we can retrieve which Address it corresponds to. (Don't forget that here the Address is also the Public Key.)signature: after triggering a signing request, thisassignwill hold the signature to be sent to the backend, for verification.verify-signature: is supposed to work as a flag to trigger the verification process or not.
The render function is also understandable at first look. If we have @connected as true, then we can render the Sign In message, trigger a new Signature Request, and then the respective verification. If @connected is false, then we render Connect, and clicking on the button triggers the Wallet connection, instead.
@impl true
def render(assigns) do
  ~H"""
  <span title="Metamask" id="metamask-button" phx-hook="Metamask">
    <%= if @connected do %>
      <.form
        for={%{}}
        action={~p"/users/log_in"}
        as={:user}
        phx-submit="verify-current-wallet"
        phx-trigger-action={@verify_signature}
      >
        <.input type="hidden" name="public_address" value={@current_wallet_address} />
        <.input type="hidden" name="signature" value={@signature} />
        <.button class={button_css()}>
          <span class="w-6"><.metamask_icon /></span> Sign in
        </.button>
      </.form>
    <% else %>
      <.button class={button_css()} phx-click="connect-metamask">
        <span class="w-6"><.metamask_icon /></span> Connect
      </.button>
    <% end %>
  </span>
  """
end
Let's start by inspecting phx-click="connect-metamask" for the case where the Wallet is not connected. It relies on the push_event function. It's a small function, but very powerful in that way that enables us to easily communicate with the Javascript side of the App, by pushing an event to the client, and where we can interact directly with Metamask.
@impl true
def handle_event("connect-metamask", _params, socket) do
  {:noreply, push_event(socket, "connect-metamask", %{})}
end
How to interact with Metamask from Javascript?
MetaMask injects a global API into websites visited by its users at window.ethereum. This API allows websites to request users' Ethereum accounts, read data from blockchains the user is connected to, and suggest that the user sign messages and transactions.
Consequently, to interact with window.ethereum, we have Javascript libraries like Ethers or web3.js. I end up using Ethers, but you can select whatever you see fit. To handle the event above, you need something like:
const web3Provider = new ethers.providers.Web3Provider(window.ethereum)

window.addEventListener(`phx:connect-metamask`, (e) => {
    web3Provider.provider.request({method: 'eth_requestAccounts'}).then((accounts) => {
      if (accounts.length > 0) {
        signer.getAddress().then((address) => {
            this.pushEvent("wallet-connected", {public_address: address})
        });
      }
    }, (error) => console.log(error))
})
Upon successful connection of the Wallet, a new event "wallet-connected" is pushed with the respectively connected address. We can handle this event in our LiveView file, just like any other emitted by our template. When receiving that event, we set @connected to its new state, and we also update @current_wallet_address. By changing these two assigns the button will now render a different thing entirely because the Wallet is already connected to our app.
@impl true
def handle_event("wallet-connected", params, socket) do
  {:noreply,
   assign(socket,
     connected: not is_nil(params["public_address"]),
     current_wallet_address: params["public_address"]
   )}
end
Since we are already connected, when clicking our new button, the event emitted when trying to submit the form is phx-submit="verify-current-wallet". Even though this form is a post to ~p"/users/log_in", this action will only be triggered when @verify_signature is true, due to phx-trigger-action={@verify_signature} (check the px-trigger-action docs for more info on how it works).
The handler for this event looks for an existing account to return its current nonce, or if an account for that Address doesn't exist, then it generates a new nonce in the spot. This way, we don't distinguish if a User trying to sign a message to log in will have a valid account or not (the process will fail later instead). This nonce is then pushed to the Javascript client side and will be used for the signing process.
@impl true
def handle_event("verify-current-wallet", _params, socket) do
  nonce =
    case Accounts.get_user_by_eth_address(socket.assigns.current_wallet_address) do
      nil -> Accounts.generate_account_nonce()
      user -> user.nonce
    end

  {:noreply, push_event(socket, "get-current-wallet", %{nonce: nonce})}
end
The Javascript code is actually very similar, and through signer.signMessage(message) a window, similar to the image shown in the introduction part, will appear and the User will be able to sign that message. If the user ends up signing the message, we can push a new event with the result in the payload, and listen to it on the LiveView component side.
As a separate note, there are several events triggered by Metamask (and not our app) that you can also listen to, and make everything feel even snappier. I didn't dive into details, but here you can find docs for API description and the full list of events.
window.addEventListener(`phx:get-current-wallet`, (e) => {
    signer.getAddress().then((address) => {
        const message = `You are signing this message to sign in with Dora. Nonce: ${e.detail.nonce}`

        signer.signMessage(message).then((signature) => {
            this.pushEvent("verify-signature", {public_address: address, signature: signature})

            return;
        })
    })
})
Then, the event pushed by Javascript is handled again on the LiveView Component, and @verify_signature is marked as true. This way, the form submission is triggered at this time, and the post to ~p"/users/log_in" is done.
@impl true
def handle_event("verify-signature", params, socket) do
  {:noreply,
   assign(socket,
     signature: params["signature"],
     verify_signature: true
   )}
end
On the Session controller's side, we receive the form params (public_address and signature), and we verify the signature. If it's valid we call UserAuth.log_in_user(user, params), if it's not, we redirect back to ~p"/".
To verify the User's signature, ExWeb3EcRecover is being used. This is a "simple" library that exports one function recover_personal_signature/2. This function returns the address that created the signature for a personally signed message by an Ethereum Wallet. So, in our case, we can reconstruct the original messages by the User (we have its nonce stored in the DB still), and then we check if the Address trying to sign in with that signature is the same that signed the message in the first place. If so, we update the nonce to a new random value, and we return the user model as success.
def verify_message_signature(eth_address, signature) do
  with user = %User{} <- find_user_by_public_address(eth_address) do
    message = "You are signing this message to sign in with Dora. Nonce: #{user.nonce}"

    signing_address = ExWeb3EcRecover.recover_personal_signature(message, signature)

    if String.downcase(signing_address) == String.downcase(eth_address) do
      update_user_nonce(eth_address)
      user
    end
  end
end
ExWeb3EcRecover depends on ex_keccak, which means you'll need to have Rust installed to compile it. For a quick and easy Rust install follow these instructions.
As you probably have noticed, in our flow no new accounts are created. That's because, for this project, only pre-configured wallets should be able to sign in. However, the change needed to have that working as a sign up should be pretty simple. For example, in the code snippet for the wallet connected, we can do something like this:
@impl true
def handle_event("wallet-connected", params, socket) do
  address = params["public_address"]
  # also validate if is not nil! The User may not connect the wallet
  Accounts.create_user_if_not_exists(address)

  {:noreply,
   assign(socket,
     connected: not is_nil(address),
     current_wallet_address: address
   )}
end
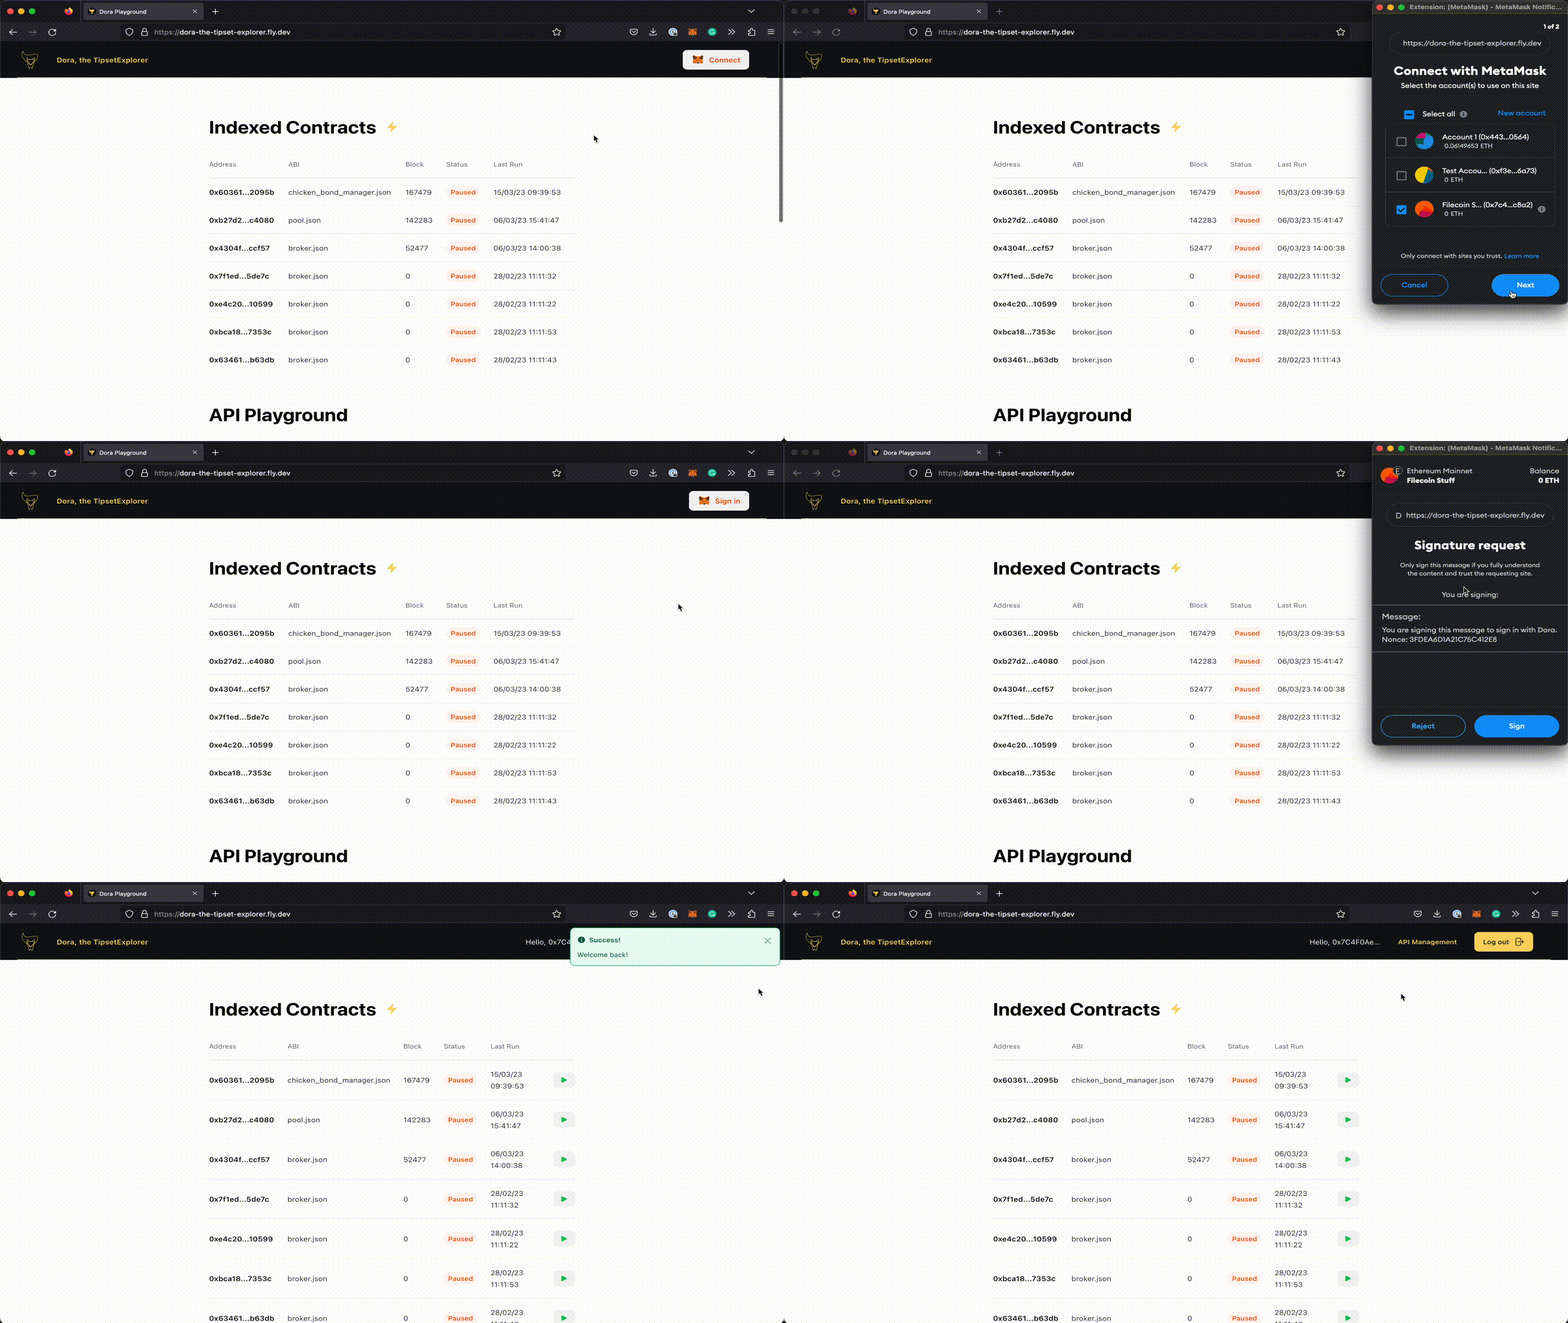
A small demo

Wrapping up
This post had a bunch of code that may be hard to follow, but I tried to explain it as best as I can. Now, to fill in the gaps, feel free to look at the full code where this was implemented and the final result:
- Github Repo
- Example App deployed with Fly.io.
If you have any questions or comments, reach out in one of my socials. And as always, stick around for the next one 👋